
A Comprehensive Guide To Installing Open Source Tools For Integrated Circuit Design
Plus two suggested projects you can work on using your newly acquired toolkit.

Welcome to a 🔒 subscriber-only edition 🔒 of my weekly newsletter. Each week, I help readers learn about chip design, and stay up-to-date on complex topics.
If you’re not a paid subscriber, here are some articles you are missing out on:
How to learn chip design with open source EDA tools — with tips on how to pick a focus area, choosing design projects, learning documentation, and showcasing your work.
The joy of semiconductor device physics series — which takes you through the basics of semiconductor physics without all the crazy equations.
The silicon photonics moonshot: Group IV integrated lasers — why making lasers with group IV materials will change everything in photonics, and why it has not happened yet.
As a paid subscriber, you also get to suggest topics for this newsletter using this form. We also have student discounts and lower pricing for purchasing power parity (see discounts).
One of the biggest challenges to learning chip design is the access to industry standard tools. They are simply too expensive and inaccessible for the self-learner. In a previous post, we discussed many open source alternatives that could be used to design circuits instead.

However, the biggest impediment to getting started with these tools is just setting them up, especially if you are not used to working with the open source tools before.
In the past week, I setup some open source tools for my own chip design experiments. In today’s post, I will show you step-by-step, with videos, how you can set up your open source toolkit for chip design as well.
Here is what we will cover:
Step-by-step install guide: In this section, you will learn how to setup your open-source toolkit with videos to assist you with every step of the process.
🔒 Design projects: For paid subscribers, you will get two suggested exercises that you should be able to complete within the week. Suggestions, tips and extra resources are included to help you along the way.
Step-by-Step Install Guide
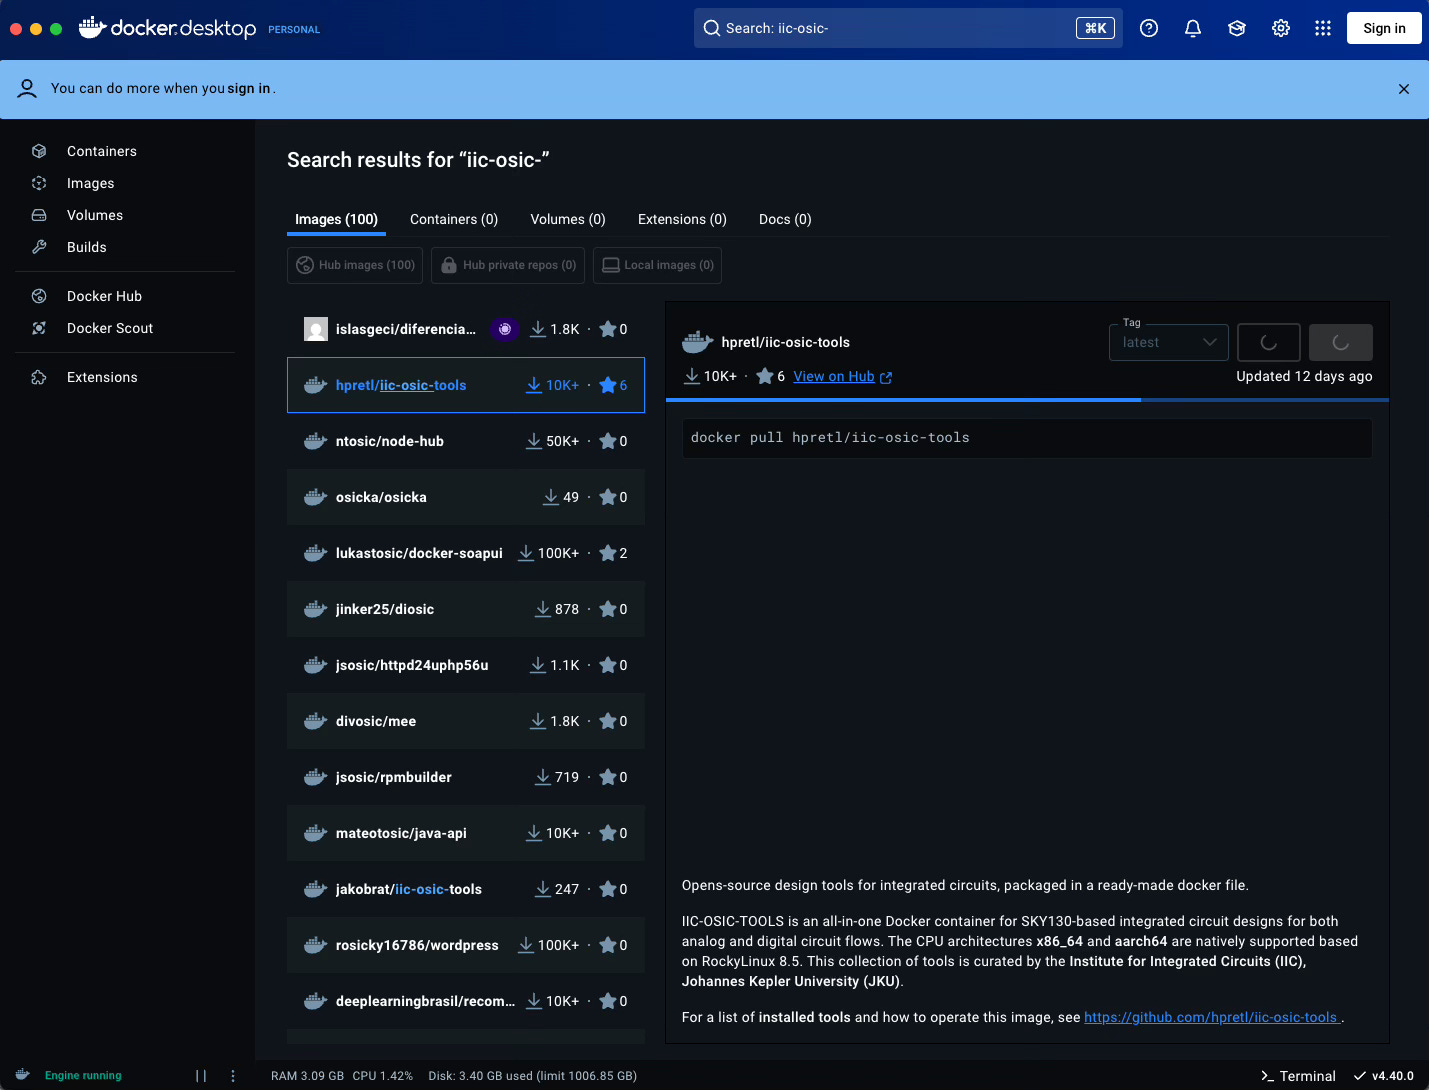
A large portion of the open source tooling required to design a wide range of digital, analog, mixed-signal, and RF circuits is conveniently available in a single package called IIC-OSIC-TOOLS, which is maintained by the Institute of Integrated Circuits and Quantum Computing (IIC) at Johannes Kepler University (JHU) and can be easily installed as a Docker container on your computer. Take a look at all the tools you will have available by installing this package.
Let’s get everything setup to design circuits.
1. Install Docker
As a prospective hardware engineer, there is a high chance you would not have come across Docker before. So let’s understand briefly how that works rather than blindly following an install guide that won’t help you if you need to fix issues.
The common approach to installing software is with an executable file (.exe) on Windows, a package on Linux (*.dpkg, *.appimage) or an installer on MacOS (*.dmg). The problem with this approach is that it depends on what software is already installed on your computer. The dependency means that sometimes software does not work because the right version of a dependency is not available on the host system causing the install to fail. Removing installed software sometimes makes a mess.
In Docker, everything needed for a particular application (open source chip design in this case) is sandboxed into a single container that is completely self-reliant. You can download a container image and set it up on your computer and it is guaranteed to work. The docker image itself is operating system independent, which means that just one container can be maintained for every install scenario. If you want to learn more, read this docker overview.
The first step is to get Docker installed on your computer. Here are the steps:
Go to Docker.com and download Docker desktop for your operating system.
Run the installer and wait for it complete.
Open Docker and go through the prompts. It will ask you to create an account, which you can skip if you want.
Here is a video of the process.
2. Download the container image
Now that you have Docker installed, you can pull the image for open-source tools from within Docker. The image is created and maintained by JHU and hosted on the Docker repository of images. But you don’t have to worry about all that; just do the following:
In the search bar on top, type ‘IIC-OSIC-TOOLS’
Look for the one with hpretl/iic-osic-tools. This is the image you want.
Make sure the tag is set to “Latest”. Click on the ‘Pull’ button next to it.
This docker image is quite large because it contains a lot of tools. It may take a significant amount of time to download. You will see a blue progress bar under the image that tells you how far along you are.
3. Run the container
Once the image is downloaded, you can run it using the play triangle on the right. When you do, you will be asked to fill out a few things before starting your container. This is a one time setup per container.
Container name
This is what the running container will be called. Give it any name you want. I used ‘osic’.
Ports
This is important to fill if you want to access your container later. Ports are like doors from your docker container to the outside world.
We will just use the default values, so fill 5901 in the first line, 80 in the second and 8888 in the third. The 80 is especially important because it represents the http port that you will use from your internet browser to access the tools within the container.
Volumes
If you want the schematics, layouts and other design assets you create within the container to be accessible outside, you need to mount a folder on your computer to the container (and back up the folder).
A volume is like a storage box outside your container so that you can get access to it without having keys to the container.
If you store all your design documents inside the container, you will lose all of them if you destroy your container. Stopping the container won’t kill your data. Removing it entirely will.
You need to specify where your mounted volume will appear inside the container. I put it in /designs. You can also mount as many volumes as you want by clicking the ‘+’ button.
Environment variables
You can configure the container with other specifics if you need to by setting environment variables. You likely won’t need to set anything when just starting out, but you can find all the options on the Github page.
Finally click the ‘Run’ button. Here is a video that shows how to start up the container.
4. Accessing your container
Now your container is running and all the tools are installed within it, all of which you can access through a web browser. So open your web browser and type localhost in the address bar (or http://localhost, if needed). You will get a login page that asks for a password. Type abc123 and you will see a full Ubuntu linux desktop within your browser. This is like a mini-computer within your computer that has the necessary tooling for chip design. See the video below if you need help with this step.
If you don’t see the entire screen like in the video, right click anywhere in the desktop, go to Settings → Display and change to screen resolution to the best looking one.
5. Exploring the container and launching design tools
Open up a terminal emulator window and we can poke around to see what is available in this container.
Finding your mounted volume
Earlier, we mounted a folder on the host computer’s filesystem into /design within the container. You can verify this by navigating there and checking that files there are the same as your host file system (create temporary text file if you have to). You should save all your design work to this mounted folder, and back up the folder on the host system to be safe.
Launching tools
You can launch various tools from the terminal’s command line. Here are few options for you to try (the link for each goes to the documentation for the tool).
Xschem: Schematic capture tool that you can use to simulate designs with ngspice. It looks remarkably like Cadence Virtuoso and has a lot of similar key bindings.
kLayout: Layout creation and viewing tool. Useful for working with any kind of layout.
Magic: Another well known layout tool that is more geared towards IC design.
Qucs-s: A schematic capture software that is well suited to analog, RF or mixed signal designs, and is SPICE simulation compatible.
There are other tools like yosys for digital design, a variety of python packages for data visualization, analysis and layout creation, and tools for passive circuit analysis like FastHenry2, FasterCap and OpenEMS. Explore all the tools you have available; it is exciting to see how much there is to learn with just free stuff.
6. Stopping the container
When you are done working with these tools and want to release the resources being used by Docker to run this container, you can go back to the Docker and press the stop button. This is essentially equivalent to turning off your computer running Ubuntu, so make sure to save your work. The next time you want start working, start the container again and go to ‘localhost’ on your browser.
If you have trouble with any part of this process, join our discord server to discuss or leave a comment below.
Two simple projects you can get started on today
Now that all the tools are installed and ready for use, it is time to do something useful with them.
Below, you will find two simple project suggestions which are considered essential skills for both analog and digital designers, and can be completed within the week. Extra resources are included if you need help.